From Damaged Photo to Framed Print: My Complete AI Restoration Workflow
The step-by-step workflow I use to take a damaged vintage photo through restoration, face repair, colorization, and upscaling — in the right order, with lessons learned from my mistakes.
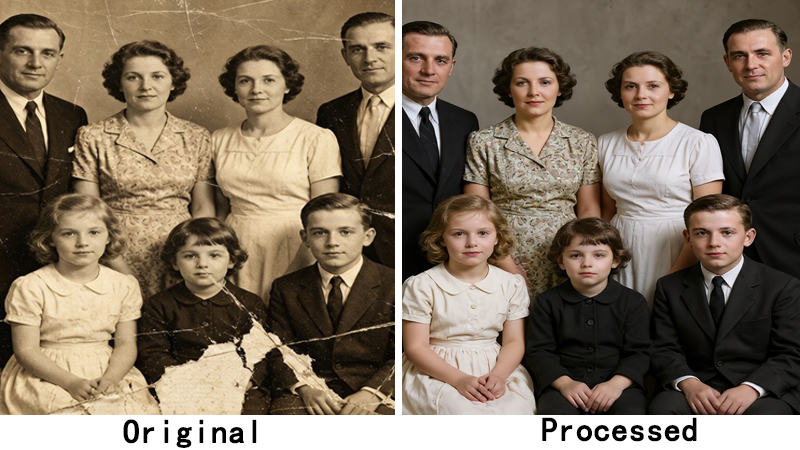
The photo that started all this for me was a wedding portrait from 1952. It had everything wrong with it: a tear in the corner, yellowed with age, faces that were barely recognizable, and of course it was black and white. I wanted to restore it, colorize it, and print it as a gift. Took me a few attempts to get the order right.
The order matters — a lot. Do things in the wrong sequence and you end up redoing work, or worse, baking in mistakes that get amplified at each step. Here is the workflow that finally worked, now simpler than before thanks to a better restoration model.
What changed: the new restoration model
We recently upgraded the old photo restoration model to FLUX Kontext Restore. The big improvement: it handles scratch removal, damage repair, and colorization in a single pass. Previously you needed separate steps for restoration and colorization. Now one model does both, and the results are more natural — especially skin tones and fabric colors. This cuts the workflow from four steps to three.
Step 1: Old Photo Restoration (first, always first)
Fix the physical damage and add color in one step. Scratches, tears, stains, fading — the model handles all of it while simultaneously restoring natural color. If you colorize after fixing faces or upscaling, you can end up with weird artifacts. Get the base image right before anything else.
After restoration, take a moment to check the result. Is the damage actually gone? Do skin tones look natural? It is much easier to catch issues now than two steps later. The model is good, but it is not perfect — occasionally eyes can look slightly off, and if that happens, Step 2 will help.
Cost: 10 credits. This is our most expensive single operation because it runs on powerful hardware and does the work of two older models combined.
Step 2: Face restoration (if needed)
Not every photo needs this. If faces are already clear after restoration, skip it. But for old photos where faces are soft or the restoration model left eyes looking slightly unnatural, a dedicated face restoration pass makes a significant difference. I use GFPGAN because it preserves identity — I want the people to look like themselves, just clearer.
Cost: 4 credits.
Step 3: Upscaling (last, always last)
This is the step that makes it printable. After everything else is done, upscale to the size you need. For standard prints, 4x is plenty. For large format — 11×14 or bigger — I use the Clarity Pro upscaler at 8x or 16x.
Why upscale last? Because restoration and face repair work at the original resolution — they are faster and more accurate when not dealing with an artificially enlarged image. Plus, if you upscale early and then discover an issue, you have to redo everything.
Cost: 2 credits for 2x, 4 credits for 4x.
What this costs in practice
Here are the most common combinations:
- Restoration only (damage repair + colorization in one step): 10 credits
- Restoration + 4x upscale (ready to print at standard size): 14 credits
- Restoration + face fix + 4x upscale (the full treatment): 18 credits
Most photos in a collection do not need all three steps. A simple 2x upscale is 2 credits. You can mix and match based on what each photo actually needs. On a Pro plan (500 credits/month), you could fully restore about 27 photos per month with the complete three-step treatment.
That 1952 wedding portrait now hangs in my parents' living room. It took me about 15 minutes total, start to finish, and 14 credits for restoration + 4x upscale. My grandmother cried when she saw it. Worth every credit.
Restore your vintage photos step by step. ClarifyPix old photo restoration handles damage repair and colorization in one pass (10 credits), plus optional face restoration and upscaling.